Showing posts with label Crafts. Show all posts

Sunday, April 15, 2012

Chevron Ombre Crocheted Blanket

Here is my second attempt at a crocheted blanket.  I'll have to get pictures up of my first one. I love the process of crocheting because I can do it anytime and virtually anywhere.  So a row here and a row there eventually come together to create something.  It does take awhile, so patience is a must! 

I followed this blog's tutorial.  However, I made the following revisions: I did not work the back loop of the single crochet but instead worked both loops (a basic single crochet, I guess?)  I also did not do stripes; I chose to do an ombre blanket, so I used the whole skein (about 35 rows) and then moved onto the next color.


I used 1 skein each of Caron's Simply Soft yarn (6 oz.) in Country Blue, Soft Blue and White.  I loved how it turned out- really quite soft.

Saturday, April 14, 2012

A New Quilt

I've been racing to get two quilts done before Baby L2 comes! Here is one that I finished just a few days ago.  A sweet mommy contacted me (after she saw a special order quilt that I had made for her cousin) and asked me to make one for her little girl's first birthday.  She wanted to incorporate a little piece of her going home outfit in the back of the quilt as well.  

She was able to pick the design and fabrics she wanted, so it was truly a collaboration.  I used the “Aviary 2 for Free Spirit” (Lilac Palette) fabric by Joel Dewberry.

I also appliqued the name of her little girl on the front of the quilt, but just for privacy sake don't have any pictures of the whole quilt. 


Finished quilt.  Don't you just love the purple and green.


The back- simple, simple.


The patchwork.


My favorite part- a small flower montage on the back that incorporates a little piece of her going home outfit and going home hat.  A sweet way to make this quilt extra special!

Hope she likes it!

Saturday, March 3, 2012

New Hat for C

Well, as usual, I had great plans to make something for myself.  However, I am no expert in crocheting so the slouchy hat I was attempting to make was looking like anything but a hat as I was going along.  So, I undid a few rows and just made up my own pattern.  It ended up being a cute, little hat for Coraline instead!  I wish I had kept notes on what I was doing, but I did not.  It is essentially, an increase of double crochets and then about two rows of a decrease of double crochets and then three rows of single crochets.  I just fit it on her head to check to see if it fit.

The front.

 The side.
The back.  It reminds me a little of a train conductor's hat!

Saturday, January 28, 2012

Chevron (Zig Zag) Quilt

I always say it but this may be my favorite quilt yet! 

As chevrons seem to be all the rage right now, I thought I'd make a chevron quilt.  I didn't follow any specific pattern, but this is a good tutorial on making a chevron quilt.  I made 5 inch squares, so the finished quilt is 43 x 43 inches.

I used the Sherbet Pips fabric collection by Aneela Hoey for Moda.  I have loved this fabric for quite awhile now (and have had this fabric in my stash for awhile), so I'm glad I waited to use it for this quilt.  


The back of the quilt.  I put two rows of charms through the back for a little visual interest.


The finished quilt.


I've put this up for sale in my Etsy shop. 

Thursday, January 12, 2012

Pillow Cover

Here is a pillow cover I made for a friend just using some scraps I had on hand. 

The fabric is from the Wonderland (or Alice in Wonderland) line from MoMo by Moda.  I doubt you can find it anymore because I've had this lying around FOREVER.  I love it though because it's so whimsical. 


 It's an envelope style pillow with button closures.  I love this easy-to-follow tutorial for the cover.


 Just another up close of the fabric.


I'm getting my crafting back on folks!  Hold on!

Another Quilt

Here is a special order quilt I made for a friend.  I LOVE the fabric choice- pinks, reds, blacks and grays.  It is the "Lost and Found" line by Riley Blake Designs.  I used an entire layer cake for this quilt.  It's a generous size- 47 x 48.  Perfect for a growing baby.

 (such a sophisticated line)

 (classic stacked coin quilt)

(red binding to tie it all together)

I love how it turned out- simple, elegant, clean.

Wednesday, January 11, 2012

One of my many ongoing crafts

I've loved cross stitching since I was about 12 years old.  I know, it's such a fuddy-duddy thing to do (no offense to anyone, I'm one of you), but there is something relaxing to making tiny, little x's all over the place (exes, xs?)  I can't even display my cross stitching creations because they just don't go with the decor of my house (way to countrified for my taste)!  But, I thought, a photo that is cross stitched may have some place on my hallway, so I went in search of a program that turned pictures into a cross stitch pattern. 

I found one for free on the web (but I'm not going to link to it yet because I thought the shading came out a little wrong).  I found it at the same time that I was doing a secret sister exchange, so I thought I would try this out by doing a cross stitch of my secret sister's kids. I thought, overall, that it turned out great.  But, the shading the program picked out was not like the picture at all (my one complaint). 


I'm now doing one of Coraline and it is still in the process of being completed.  I used a different program and paid $7 for this one, so I want to see if the shading comes out better.  So far, she's looking a little orange.  I'll make sure to show you the before picture and the completed cross stitch so you can compare yourself.  Did I mention cross stitching takes forever!!  It may be awhile before that post comes out!

Thursday, November 3, 2011

Halloween

I had great intentions this halloween to make another homemade costume but could not find a yellow rain jacket or rain boots (you'll just have to wait and see who she'll be next year)!  So, we decided to revamp last year's costume--

a hot fudge sundae


Imagine, if you will, a scoop of vanilla ice cream with a large drizzle of hot chocolate (which pools at the bottom of the bowl) along with whip cream and a cherry on top! 

The hot fudge drizzle is an old shirt of mine that I took in and cut to create "drizzles."  Although you can't see it, I weighted the drizzles with some brown beads so the material wouldn't curl up.  The tutu is about as simple to make as they come- I used this tutorial.  The whip cream hair clip is my own creation- I made a tube of white material, stuffed the front part of it with batting and curled it around itself (like a snake) to create the whip cream.  I used red felt and a little brown ribbon for the cherry.  Really easy.  Paired with a white onesie and brown pants, this costume cost me about $5.00 (for the beads and tulle).


Ever seen a hot fudge sundae go down a slide-- well, now you have!

Sunday, October 30, 2011

Hello out there.

Sorry, I've been MIA for awhile.  No excuses really.  Just haven't had much too blog about. 

I haven't been crafting too much lately.  Although, there is one project that I'm dying to share with you-- I receive the Martha Stewart magazine and they had this neat article on creating a cross stitch portrait of your family.  I used to cross stitch all the time and thought a family portrait would make an adorable wall hanging.  So, I got out the graph paper and started drawing our family. . .  


Here is the finished product--


Oh, yes, you've noticed the little addition in yellow-- he/she will be here sometime in April!  I shall call him/her Baby L2.  I guess that little one may have prevented me from crafting and blogging recently.  We will have to do better Baby L2 if we want any readers!

Definitely more crafting to come!

Monday, September 26, 2011

Special Baby Quilt

Although, I've taken a small break from quilting I was able to create a very special quilt for a friend recently.  I used fabric from two of her baby blankets to produce a new quilt for her little girl.  I will admit that I was nervous taking someone's special treasures and cutting them apart, but I knew I could do it and create something really special in the process.


The finished product. 


Her little girl's name surrounded by applique flowers from her baby blankets.


 The center piece was an applique elephant that was the primary focus of one of her baby blankets.  I made it the center of this quilt as well.


I used pink gingham and the light pink bunny fabric from her original baby blankets and filled in with other coordinating fabric.  I did get some help from the ladies at the quilt shop and found them to be very helpful.  If you ever have questions about scale and color, ask the workers.  They know what they are talking about and it was very reassuring to get their advice.

I love the back print because it incorporates all the colors of the quilt.  The mom-to-be's designing the nursery in pink and brown and her baby blankets had light pink, yellow and turquoise colors.  I wanted to make sure all the colors were represented. 

 I also got new tags from here.  Super reasonable and very nice quality!

What do you all think?

Sunday, August 28, 2011

Laird's Quilt

Here is another quilt for Mr. Laird.  He's a very lucky boy to get two quilts!  One for summer/fall and one for winter/spring.  Remember this one?


Alex, Laird's mom, picked out the fabric.  I think she's got great taste!  Super modern, great colors and very boy-like.  This one had cars, surfboards, ducks and ukulele's.  Most of the fabric is from the Monaluna Circa 60 Beach Mod for Birch Fabric line and a little Joel Dewberry and Timeless Treasures.


We kept the back of the quilt very simple with a single strip of 8 x 8 fabric squares running through the back.


Some of the fabric up close.

It's another big quilt (51 x 51) so he'll be able to use it for a long time!

Saturday, August 13, 2011

New Outfit

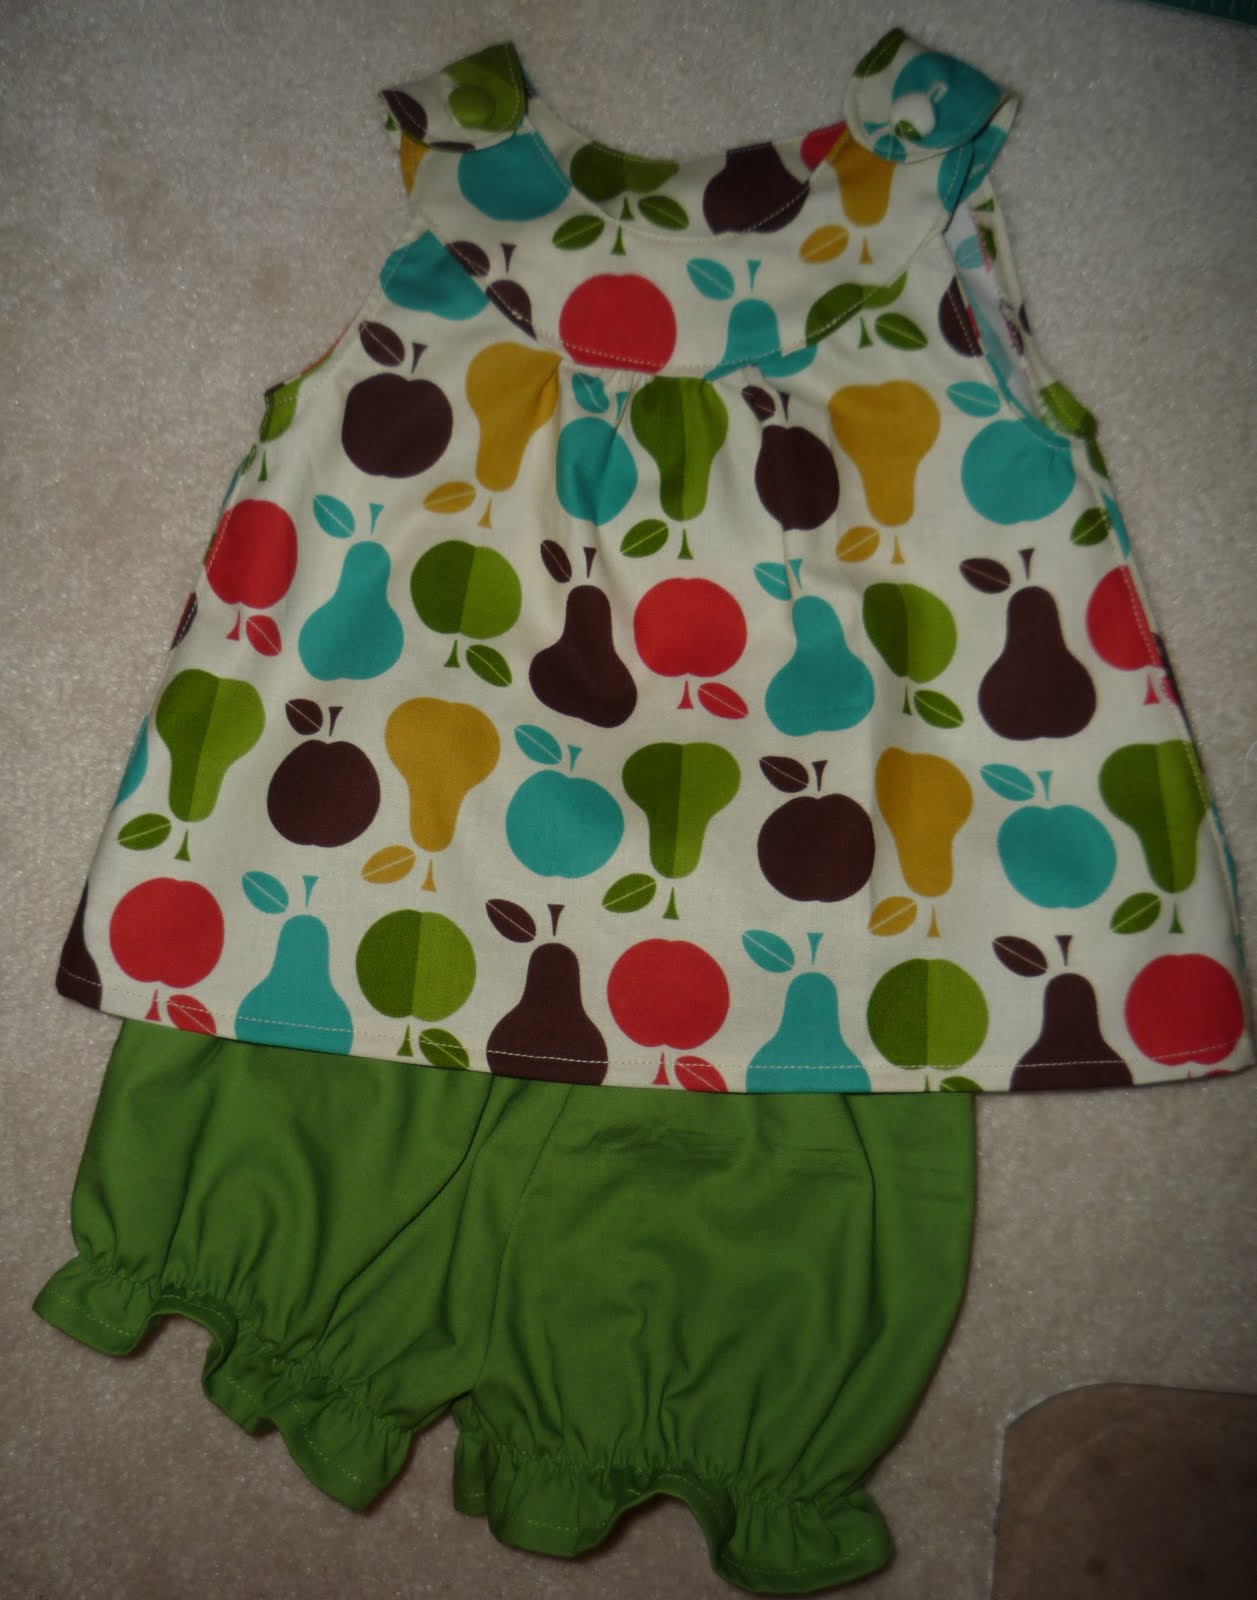
I wanted to tackle a few of the cute tops that I have collected on my Pinterest site for Coraline.  There are so many cute ones to choose from! I found this material at Joann's and thought it was perfect for her.


Here is the link to the top.  I found it very easy to construct.  I followed her pattern which is for a 12-18 month size, but it was a little snug on my 15 month old, so I tried it again and added 1/4 inch all the way around the pattern and it came out to be a much better fit for her.  I made it a top, but you could easily add some length and make it a dress.

I've gotten some compliments on it, so I think it's a winner!

The bloomers are my own pattern- hopefully, I can make a tutorial for you on that soon.  However, you could do a search for bloomers or diaper covers and come up with lots of tutorials.

Happy sewing everyone!

Saturday, July 16, 2011

Summertime Bucket Hat

I've wanted to make a bucket hat for Coraline for awhile.  I think they're adorable and perfect for keeping that head covered during the summer.  The problem is that she won't wear a hat (or any hair accessories) right now.  Oh well, I had some extra fabric, so I went for it anyway.  It's a two-in-one hat (reversible).  It's a little big because I followed her pattern which is for a 2T.  But, I figured if she wouldn't wear it now she may in the future. 

Here is the tutorial I followed.  Very easy.  I did include one side of interfacing to stiffen it up a bit and I did do 1/4 inch seams all the way up the brim.

Since I just used boring old white fabric for the inside (more of a liner), I may add straps so she'll keep it on.  This will take away the reversibility function. 

Oh how much fun I could have with this pattern!

Monday, July 4, 2011

Culotte Tutorial

My niece is going to her first overnight camp this week and they require that the girls wear culottes.  According to my sister, culottes can run around $25 a pair.  That's a bit much for some fabric and elastic, so she asked me to make her some.  My niece got to pick out her favorite fabrics and we were off!  After looking at the construction of a culotte, I realized that it is a pretty simple construction. 

Some interesting facts about culottes- they are supposed to look like a skirt, but really are "baggy" shorts and they are to have an elastic band (no zippers or buttons). 

My niece is a children's size 6, but you could easily make this smaller, larger, longer, etc. to fit the size of your child.

You'll need:

1 yard of fabric
22 inches of 1 inch elastic
basic sewing materials

First, I took a pair of her culottes and made my own pattern out of it.  Here are the dimensions that I used:

Skirt/Short part.  Place the long side (14 inches) on the fold of the fabric.

Basically you want to start out with a rectangle.  Measure in 8 inches from the top and make a mark.  Measure 6.5 inches down and make a mark.  Now you are going to cut a "J" (this is the crotch).  Bottom notch is similar.  Measure 3 inches up from the bottom and make a mark and measure 5.5 inches from the left and make a mark.  Cut an angle.  This is part of the bottom of the culottes.    

Waistband.  You will want a total of two pieces. 

You have a total of two pieces.  This will be the skirt/short part.

Place the right side of the fabric together and, using a 1/4 inch seam, sew along the long side (14 inch) and the inseam (4.5 inch).  You will want to serge or use a zig-zag stitch on the raw edges so it won't fray.

One part of the culotte done.

This is what it looks like when you turn it right side out.


Now, pin the two legs together and sew using a 1/4 inch seam- this will be the crotch part. Set these aside for now.

Onto the waistband.  You should have two pieces.

Place right side together and sew along the short sides (6.5 inches) and create a tube.

Now we are going to create the tube for the elastic.  Fold down 1.5 inches, and then fold the raw edge under another 1/4 inch to create a tube for the elastic. 

Sew right on the edge of the bottom fold.  Make sure to leave a space to thread your elastic through.  Set this aside for now.

Now on to the pleats of the culotte part.  I put three pleats onto each leg of the culotte.  One at 2 inch, one at 6.5 inch and one at 11 inch.  My pleats lines were marked at 1.25 inches apart.

You will want to overlap the third pleat on each culotte (front and back) so that it hides the shorts part of the culotte.  This is the step that makes it look like a skirt.  If you look at the picture above, I've put the pleat on the left side of the culotte over the crotch seam.   

Now, I've placed the third pleat on the right side over the third pleat of the left side, so that you can't see the left side pleat anymore. 

This is what it will look like after you pin it.  (Looks like a total of 5 pleats, but really it is 6 because one pleat is hidden).

Now, make sure your waistband matches up to your culottes (you may need to adjust your pleat sizes) and then place your waistband over the culottes (right sides together), pin and sew together. 

When you are done, it will look like this.

I topstich the waistband into place.  It looks cleaner to me.

Now, time to thread your elastic into the waistband.  Sew together elastic and then sew the opening shut. 

On to the hem.  Make this whatever size you need too.  Mine ended up being 1/4 inch hem.

Finished!! 

I made four culottes in a span of two days.

A good view of the shorts part.

See how it resembles a skirt when layed out.

That little cut out in the leg helps the hem stay all the same length and makes it look like a skirt.  Without it, that piece hangs lower than the rest of the hem.

This is my first tutorial and I apologize in advance for anything that doesn't make sense.  Please ask me any questions.